The dedicated DJ controller has grown rapidly in popularity over the past few years. As home PCs have become more powerful, and DJ software has become more refined and stable, spinning tracks from your laptop has become all the more viable.
Dedicated DJ controllers are designed to mimic the familiar “Two decks and a mixer” setup, so as to be instantly familiar to DJs. However, if you’re not sure about making the jump to digital, and you’d like to give an application such as Traktor or Virtual DJ a test drive, you don’t need to jump straight in and buy a controller from Hercules or Numark.
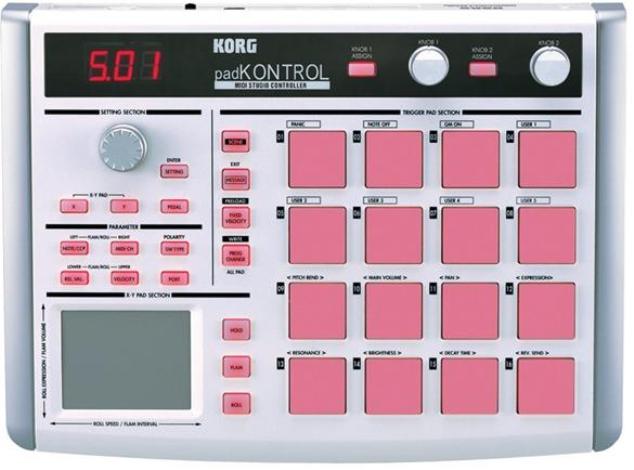
Most DJ applications will allow you to map the knobs and buttons of any generic MIDI device to control the parameters of the virtual decks and mixer. In this example, I’m going to map the controls of a Korg PadKontrol drum pad, to manipulate the parameters in Traktor 3. However, you can use any MIDI device and any application that supports re-mapping.
Connect the MIDI device, either via an interface or the device’s built-in USB port. Traktor will probably recognize the device as a generic MIDI controller, even without drivers installed, but if you encounter any issues, download the driver pack from the manufacturer’s website and try again.
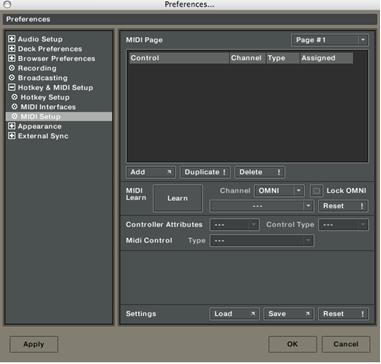
Launch Traktor and open the “Preferences” dialog from the “Edit” drop down menu. Open the “Hotkey and MIDI” category from the tree on the left side of the Preferences dialog. Select “MIDI Setup” from the bottom of the sub-category.

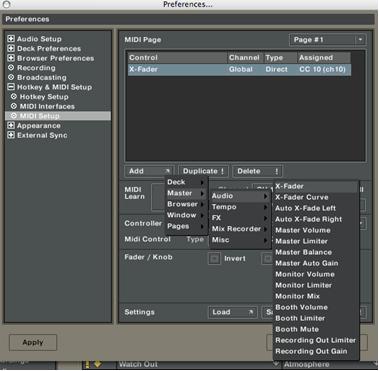
Click the “Add” button, and select your desired action from the drop-down list of functions. They’re broken into smaller categories to help you find what you’re looking for. I want to assign the cross-fader to one of the PadKontrol’s rotary knobs, so I choose “Master > Audio > X-Fader.”

An assignment value appears in the window above, showing our target parameter, in this case, “X-Fader.” Click the large “MIDI Learn” button underneath the window and turn the knob on the controller to assign it to the chosen function.
The controller attributes are editable in the window below. For a rotary knob, they are pretty straightforward, and the software automatically maps the 0-127 MIDI value to the full rotation of the knob.
A manual crossfader makes a big difference when evaluating a piece of DJ software. You’ll never really know how good an application is when you’re trying to fumble through it with a mouse, or even worse, a trackpad!
With the PadKontrol, we’ve got a whole host of buttons that can be used to make the controller even more functional. You need to use your imagination a little when assigning a non-standard controller to a DJ app, one of the big benefits of a DJ controller is its familiar layout. Anyone who has used a pair of decks and a mixer will pick up the basics instantly, as everything is in its usual place, or helpfully labeled. When modding a controller like this, you need to think about the controls you use most often, and what you want to have at your fingertips at a moment’s notice.
Using the same method as above, I assigned the PK’s second rotary knob to blend the headphone output between Deck A and B, allowing me to monitor both tracks just like a dedicated DJ mixer.
The PadKontrol has a familiar MPC-style array of 16 hit pads arranged in a four-by-four square. I decided that I would split the buttons into two pairs of columns, with each one performing the same functions on a particular deck.

I assigned the top buttons in the first and third row to act as Play/Pause buttons for the first and second deck respectively. To the right of each play and pause button I assigned the second and fourth buttons to drop loop markers on each deck.
The bottom row I set up as bypass switches for the four effects bays along the top of the screen. Each of these switches only allows me to switch each effect on and off, and I’d really to be able to manipulate the effect controls on the fly.

I’ve already used all of the device’s available rotary knobs, so I’ll have to use the PadKontrol’s onboard track-pad. This involves using the same assignment process as before, but you have to be really delicate when using the “Learn” function. When assigning the “X” axis you have to move your finger vertically, and only vertically! If you make the slightest move to one side you’ll assign the “Y” axis to the same parameter, producing some pretty dull effects when you start to trace shapes. To make the process even trickier, the track-pad is pressure sensitive too!
We can get around this by manually editing the assignments in the preferences window. Highlight the assignment in the upper portion of the preferences window, then click on the “CC” drop down box next to the MIDI learn button, and select your chosen channel. They’ll be labelled as “Track-Pad X” and “Track-Pad Y”
These assignments aren’t hard and fast rules by any means, one of the best things about manually mapping an unsuitable controller to an application is the fact that you are in control of what each button or knob does. You don’t need to rely on the manufacturer’s ideas of what makes a good controller, and you can completely tailor it to your own personal style. You can have a straight beatmatching and mixing setup, an loop station or a groovebox, just by choosing different assignments and taking advantages of Traktor’s features. With a little experimentation you can come up with something completely unique.


