Control automation is another input method for your digital audio workstation. Where MIDI information is designed to transmit note information, such as pressure and velocity, control automation is used to transmit peripheral control instructions. It might be used to move the volume faders on your mixer, or do some more interesting things with synthesizers and other instruments.
The Basics
Automation data is very similar to MIDI in the sense that you can “draw” patterns into the interface window, which will then be translated into input information for your instrument. Rather than a MIDI piano roll or grid, automation data tends to use a plotted line graph. The lines start off straight by default, and you add nodes by double-clicking on the line. The nodes can then be dragged up and down to create shapes and patterns.
The colored lines overlaid on the track window represent the movement of a particular control. The upper channel has been set to “Pan,” so the pan control will follow the line when the track is played, gradually panning halfway to the left, then levelling off before swinging quickly to the right. The track below has been set to “Volume,” so the volume fader on the mixer will track this pattern, fading up and down as the line dictates. This is great for fading audio files in and out without having to permanently alter the gain structure of the file.
Read, Write, Touch
Almost every DAW has its own equivalent of the “Read, Write, Touch” modes for automation control. They refer to the way that the DAW interprets inputs from a connected control device. “Read” is the best option for those of you who don’t have a control device. If you draw in your automation patterns with a mouse, “Read” mode will cause the software to track your patterns. If you do use a controller to write your automation patterns, you’ll set it to “Read” mode once you’re finished.
“Write” mode is for using your controller to write automation data to the track. With “Write” mode enabled, any movement you make on your controller will be translated into a plotted line graph within the DAW. Any existing automation data on that channel will be ignored and overwritten.
“Touch” mode is a combination of the two modes. The software will follow the existing movement data, and the control movements will be replicated by your DAW. However, if you “Touch” your controller while the track is playing, it will add in additional movements, incorporating them into the existing automation.

You can see here that I have drawn a basic pan pattern with the mouse. The control moves to the left channel, waits for a bar, then sweeps back to the right.

I then played the track through again and randomly moved the pan control during the flat section. As you can see, it’s incorporated my random jagged movements, but it has kept the initial pan movements that I drew with the mouse.
Advanced Techniques
Most DAWs include automatic support for mixer automation, you can usually select the faders and pan controls directly from the automation menu. However, you can go deeper, and use automation to directly manipulate the parameters of instruments and effects in real-time, creating morphing, undulating sounds that add real life and character to your music. Depending on your software, you may have to go about this in different ways.

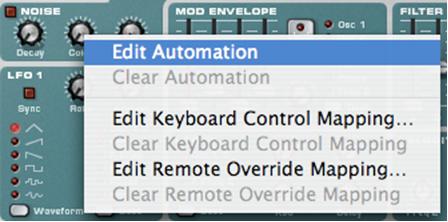
Reason has one of the most user-friendly ways of setting this up. Simply right-click on any switch, fader or dial on any instrument or effect, and select “Edit Automation.” This will open a line-graph window in the MIDI editor. You can then draw a point-to-point line to control the automation.
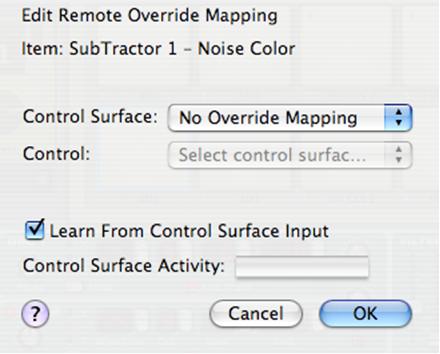
If you click “Edit Remote Override Mapping,” it will open a second window, where the parameter can be assigned to any control on your input device.

Check the “Learn From Control Surface Input” box, then touch the control on your device. If all is connected properly, you’ll see a spike in the “Activity” bar. Click “OK” and that parameter will be bound to that particular control.
Though these particular instructions refer to Reason, most DAWs employ a very similar system for mapping parameters to MIDI devices.
Being able to map any parameter within your DAW to any control on your device is a very powerful concept. Though programming with a mouse and keyboard can give you some great results, they’ll always sound a little robotic and sterile. This might be exactly what you want, but if you’re looking to add some life and dynamics to your music, adding some manual control can really liven it up. It’s also a great deal of fun, playing back a programmed track and working the dials to twist things up. It really feels like you’re “playing” the whole track like a live instrument.
Manipulating the filter control on a bass synth can give you a funky “Wah” sound that would normally require external routing and a dedicated effects unit. Mapping two controls to the rate and intensity dials of a filter LFO can allow you real-time control over the ubiquitous Dubstep “Wobble.”
The possibilities really are endless, and if your controller only has a few controls, there’s nothing stopping you from making multiple passes through the track, re-assigning the dials to different parameters each time.


