Ableton’s “Live” software package has always been an unusual feature on the DAW landscape. Intended, as the name suggests, for Live audio manipulation., it does things a little differently than its studio-bound equivalents.
Some of its unique features are ideal for DJing; there is an integrated beat detector that keeps things on tempo, and an innovative interface layout that will make sense to those familiar with samplers or step-programmers. The trick to getting the most from Live is understanding all the tools it puts at your disposal. Because it is designed as a live performance tool, it can let you build sets, mixes and mashups in real-time, once you get to grips with the unique layout.
The Warp Engine
This is Live’s built-in beat detector and manipulator, it compresses and stretches any audio you feed it to match the project’s master tempo.
Adjusting and manipulating the audio manually is a little tricky to get your head around at first, but if you master it, you’ll be able to sync beats and samples together perfectly with just a few clicks.
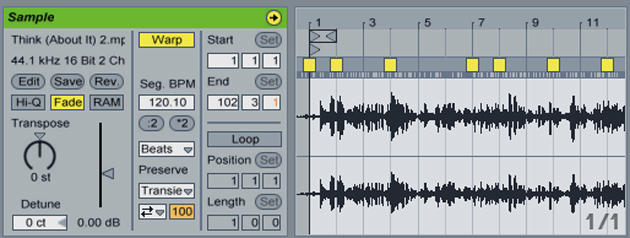
With a clip loaded in to Live, the Warp engine will automatically detect its tempo. You’ll see its waveform at the bottom of the screen, with a series of vertical grid lines covering it. These represent beats and divisions in the project’s master tempo. If you drag these grid lines to the edge of a phrase or loop using the arrows at the top of the waveform, it seems like you’re stretching the tempo to fit your source material. In actual fact, the Warp engine performs the opposite action, compressing the audio to fit the master tempo.
 Clip View
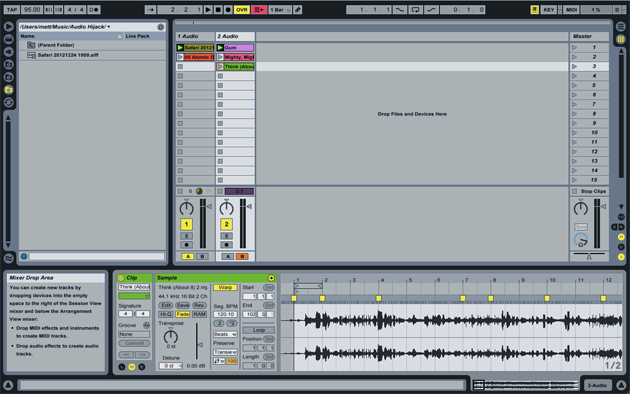
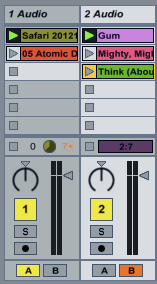
As well as the standard multi-track view we’re familiar with from other DAWs, Ableton also uses its proprietary “Clip View.” This displays all the audio media currently loaded into a project, as individual Clip units, each with its own play button. While the project plays at a standard tempo in the background, each clip can be triggered individually, and will sync with the master tempo, thanks to the Warp Engine.
Clips are laid out in a series of track columns, with each column representing a channel on the mixer. The standard volume, fader and pan controls are at the bottom. The slots at the top allow you to drop in audio files which will play back on that particular mixer channel. By creating neighboring columns, you can layer up dozens of simultaneous tracks or samples, all locked together in perfect sync.
Mixing
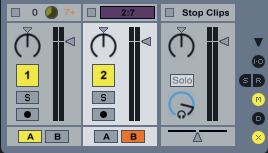 There are two ways to mix your tracks in Ableton, within the application or using your own standard DJ mixer. You’ll need a sound-card with at least two outputs, as with any DJ application, but you can choose how to set them up. You can send one output to each channel on your DJ mixer, then connect to a PA or monitors as you usually would. This gives you a familiar control layout, plus additional control over EQing and panning.
The other method involves sending one output to a PA, then using the second output for headphones. This will mean adjusting faders and levels using your mouse or trackpad, which is less than ideal, but it also means you can play a set with nothing but your laptop.
To enable the software mixer, click the “X” button in the lower right corner of the Clip View. This adds an “A” and “B” button to the bottom of each track, and a crossfader in the Master Mix channel. Clicking “A” on a track will route it to channel 1, and clicking B will send it to channel 2. The crossfader can then be used to blend between them.
Starting to Build a Set
Drag tracks from your hard drive into the Clip View area to process them with the Warp engine and turn them to clips. Ableton doesn’t create a new version of the audio, it just stores the editing information in a separate file, and applies the same changes every time you load that clip.
Your imported tracks will be locked to the master track tempo, visible in the top left corner. You can drag it up and down to set the master tempo, or use the tap button to its left. If you create two audio tracks, you can think of them as decks 1 and 2, and cue up a playlist for each.
Play the first track on deck one using the play button on the clip. Trigger the second track on deck two at the appropriate point, and blend across using the crossfader, just as you would in any other DJ application.
Experiment with different tracks and see how the Warp engine reacts to adjusting differing tempos. There’s more to learn about fine-tuning the tempos of tracks, adding effects and creating a longer, automated set.
