 This is a valuable production topic, and one that is sometimes overlooked by new producers in the mixing process: speaker placement and room acoustics.
Just to be clear here: A proper understanding of room and recording acoustics can be the subject of years of study, as a whole science—the science of acoustical engineering—is devoted to its application. My goal in this section is to give you a good general understanding of how room acoustics relate to your perception of a mix and some solid steps you can take to improve the fidelity of the perception of your sound through proper placement of your monitors (assuming you are using near-field studio monitors).
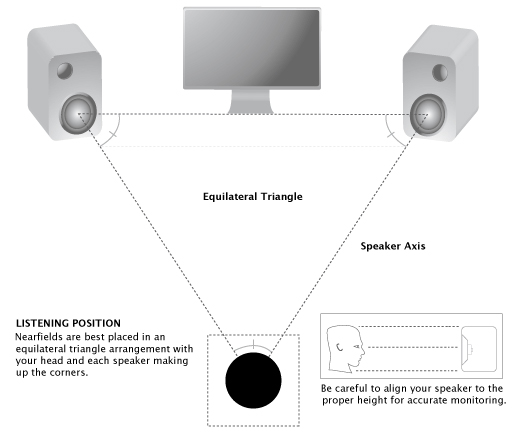
The first and probably most common piece of advice you will hear: Make sure your studio monitors are at an equal distance (generally 3-5 feet) from themselves and from you. This means that your studio monitors should form an equilateral triangle from your left monitor, right monitor, and your head. This will ensure that you are receiving the sound from both monitors as the waves converge, giving you a clearer picture of the sound. Your monitors should also be angled slightly toward you.
Poor triangulation and placement will result in an uneven perception of the the stereo image, and may cause you to make poor panning, stereo and other mixing decisions based upon that flawed perception. I would also suggest putting your studio monitors on individual stands to minimize any vibrational effect they might have on the desk or workstation you are using; this is especially important when mixing bass frequencies, as the extra rumble from the desk could be erroneously perceived as extraneous bass needing to be cut from the mix! This also goes without saying: Make sure your monitors are at the same height level!
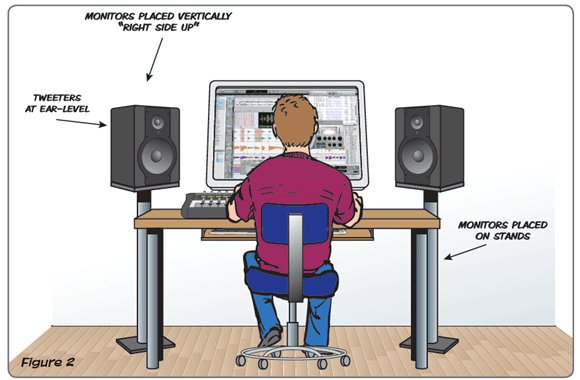 Studio monitors should also be placed so the tweeters of the monitors are at ear-level. This is because high frequencies—those specifically produced by the tweeter unit—tend to be very directional in nature. Unlike bass frequencies which are omni-directional and can be perceived well without being specifically aimed at the user, high-end frequency sounds are better perceived when they are aimed directly at the listener. By aiming the tweeter directly at the height of your ears, you are ensuring the best perception of your mix possible.
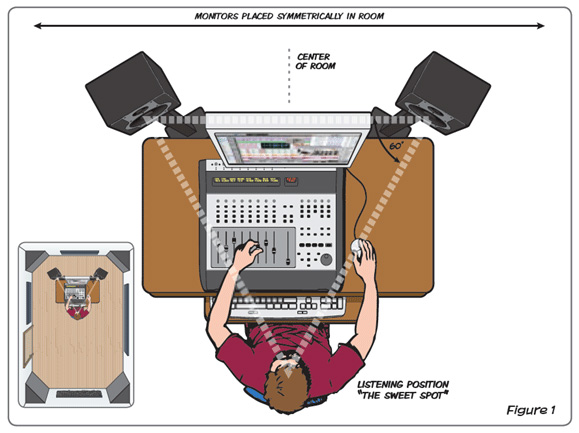
 The placement of your workstation and monitors within a room itself is also an important factor. Ideally, your workstation should be placed in the center of the room, approximately one-third the length of the room from the wall your station faces (the image below does a great job of demonstrating this positioning). The reason you want these placement parameters is because of the nature of the way sound waves bounce off of objects. Centering studio monitors off to the side of the room will cause sounds to bounce unevenly off the walls of the room, producing a warped and unbalanced sound. For this reason, at all costs, avoid placing your workstation in the corner of a room. Placing the studio monitors away from the wall you are facing will also prevent the buildup of bass frequencies and lead to a clearer, more accurate perception of the low end of your mix. Also avoid placing your workstation too close to the wall behind you: This orientation can cause reflected sound waves to bounce back from the rear wall and distort your perception.

All the above placement techniques will definitely help you to improve the quality of the room acoustics you are working with and give will you a more accurate perception of the mix coming from your monitors. Keep in mind, these are meant to be general guidelines which will help you understand acoustics and should not be taken religiously. Feel free to modify, explore and experiment with different types of setups and speaker orientations in order to produce the kind of sound you believe most accurately represents your mix. There is also no perfect room, especially in relation to home and project studios, but the guidelines outlined in this brief article are solid basics which should give you a decent understanding of how to position your monitors.