In the first two parts of this guide (Pt 1 & Pt 2), we showed you how to capture a great vocal sound and a fantastic vocal performance. Now that you have the vocal recorded, how do you process it to ensure that it can compete with the very best tracks out there?
Comping A Great Lead Vocal
Comping a vocal can be a laborious task, but it is an absolutely vital part of the recording process. To go back to basics for a moment, when you recorded your vocalist, you will hopefully have captured numerous takes of them singing the same line. Comping is the process by which you go through all of these takes and assemble the very best lead vocal take that you can from them. You need to decide when recording how many takes of each line you want to capture. If you record too many takes, the comping may well take you forever to get finished as you pick through every word on every take to choose the best. However, if you record too few, you may reach the comping stage and find that you don’t have enough good quality stuff to comp a lead vocal that you are completely happy with. As a general rule, you can probably record fewer takes when working with a great singer, you’ll need more when working with a weaker singer – you’ll have to work this out for yourself though, on a case-by-case basis.
When going through the takes, don’t just listen for takes that are in tune (we can fix tuning later on!) – look primarily for performances that have character. A characterful vocal performance will really stand out, and add something to your track, so try to always bear this in mind. What are your particular singer’s quirks? Are they worth bringing out in the lead vocal?
There are various functions particular to different DAWs (Digital Audio Workstations) that can speed up the comping process – for example ProTools’ ‘playlist’ system (see illustration below). They are too numerous to name them all here, but it’s worth investigating your own software to see if you can find any shortcuts.
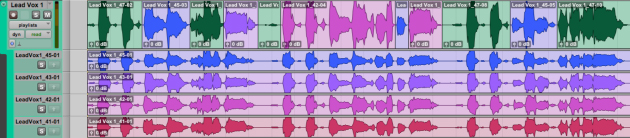
ProTools ‘playlist’ system
Whilst comping your lead vocal, it is probably wise to comp your double track (DT) vocal as well – this vocal will sit significantly lower than your lead in the mix, and will add extra body and richness to your final vocal sound. Although you certainly don’t have to include DTs in your final mix, it is fairly standard practise to do so. Vocals can often end up sounding a little thin without them, and you should probably think about using them for at least the chorus/main hook of your track. In fact, for a really ‘big’ sounding commercial record, you might want to consider using three or more separate DTs when your chorus kicks in, to really beef it up.
Your DT track should not necessarily come from your second best take; it should come from the take that compliments the lead vocal the best – where timing and inflections are most similar. It is there to support your lead and shouldn’t draw attention to itself. By going through the following processes, you can ensure that it will sit very nicely within your mix.
 Pitch and Timing Correction
Pitch correction has probably become more of a standard process within the music industry than you realize. Many tracks by many credible bands do certainly feature pitch correction, even if they are unlikely to shout about it! Within EDM, it is extremely prevalent. One thing that it is important to realize, is that pitch correction is not just for poor singers, it is often used to just subtly correct the pitch of very good singers. It has become part of the high-gloss world of modern production, and if you want a high-gloss sound, you should probably use it. The two leading pieces of pitch correction software are Antares’ Autotune, and Celemony’s Melodyne. Both do an excellent job – and can obviously be used as creative tools – as well as just to move a vocal perfectly in tune. You will certainly find that your DT sits a lot more comfortably behind your lead vocal if both are tuned, as this increases the similarity between the two takes.
A certain amount of timing correction will be necessary if you are double tracking. At the very least, the timings of hard consonant sounds should be matched up between the lead and DT – for example, it is strikingly obvious when a ‘t’ has been sung twice at slightly different times. Essentially we are trying to make multiple layers of vocals sound like just one layer; one extremely good sounding layer! You can go in and do this editing by hand and achieve excellent results, but again this can be time consuming. If you are after a very polished sound, software like SynchroArts Vocalign may prove very useful. This has the advantage of synchronizing not just the consonant sounds, but the vowel sounds as well. It is actually quite a remarkable piece of software, and is useful for lining harmonies up to the lead vocal as well as the DTs. This video gives an insight as to how it works:
Effects Chain
In most cases, the effects chain you apply to your lead vocal will be the most complex chain in your entire mix. There are many ways to process a vocal, and none are ‘right’ or ‘wrong’, the processing depends on the sound of your singer, the sound you are trying to achieve and the genre you are working in. Don’t be afraid of spending time experimenting – and don’t be afraid of doubling up on certain effects if doing that produces a sound that you like. Getting the right tone is incredibly important when mixing vocals and sometimes using multiple compressors (for example) can give the vocal a nice warm tone that fits the track.
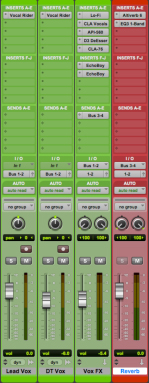
The images below and to the right show a vocal effects chain I used recently on a commercial EDM track. To begin with the lead and DT are both fed through Waves Vocal Rider – this plug-in automatically rides the level of the track, smoothing it out; this means that you don’t have to automate this information manually. Next, the outputs of both tracks are sent to a dedicated vocal effects bus. They are then passed through a very light distortion (Avid LoFi), just to add a little bit of grit to what was an overly smooth vocal. Next they pass through a compressor (Waves CLA Vocals) and an EQ (Waves API 560), before being put through a de-esser (Avid D3 De-Esser). They then pass through a second compressor (Waves CLA-76), before finally passing through two separate delays (two different instances of SoundToys Echoboy). With this done, an effects send is sent from this effects bus to a separate bus where reverb is added.
This is a fairly complex set-up, but it was arrived at over a long period of time spent experimenting with various effects chains! Pay attention not just to the effects you use and the settings on them, but also the order you place them in – this has a dramatic effect on the final sound. The only way to really get a feel for this is to experiment – and searching for that ultimate vocal sound is an ongoing process – you can always pick up new tips and tricks!