Ableton’s slightly oddball Clip View interface is a pretty unique approach to computer based music creation, it shares more in common with a hardware sampler or Groovebox. It makes sense then, that there are several controls that mirror that same setup. There’s a lot of emphasis on making your computer feel more like an instrument that a desktop machine. There are very few numeric fields that require numbers typed into them. Values are generally altered by dragging or sliding controls, making things as fluid and visceral as possible.
Since Ableton is designed for Live use, there’s a focus on the controls being quick to use, making heavy use of keyboard buttons and “nudge” controls.
Tempo Nudge
![]() The two striped buttons by the BPM readout represent a concept that will be immediately familiar to DJs. They’ll be of particular interest to those planning to use Live to play alongside other musicians. They allow you to slow or speed the master tempo of the project in tiny increments. This is ideal for smoothly and accurately syncing in with some an external source. It’s possible to set the tempo numerically by clicking and dragging, but this is difficult to do accurately. The Nudge buttons are similar to dragging a finger against the platter, or giving the vinyl a little push.
The two striped buttons by the BPM readout represent a concept that will be immediately familiar to DJs. They’ll be of particular interest to those planning to use Live to play alongside other musicians. They allow you to slow or speed the master tempo of the project in tiny increments. This is ideal for smoothly and accurately syncing in with some an external source. It’s possible to set the tempo numerically by clicking and dragging, but this is difficult to do accurately. The Nudge buttons are similar to dragging a finger against the platter, or giving the vinyl a little push.
Computer MIDI Keyboard
![]() Pressing the piano icon in the upper right, turns your computer keyboard into a functioning MIDI keyboard. The middle row of keys (A,S,D) represent the white keys, and the upper row represents the black. The Z and X keys allow you to switch between different octaves, while C and V control the master velocity. The values for these parameters are displayed in the lower status bar whenever they are altered. This isn’t particularly user-friendly, but it can be handy when a real MIDI keyboard isn’t available.
Pressing the piano icon in the upper right, turns your computer keyboard into a functioning MIDI keyboard. The middle row of keys (A,S,D) represent the white keys, and the upper row represents the black. The Z and X keys allow you to switch between different octaves, while C and V control the master velocity. The values for these parameters are displayed in the lower status bar whenever they are altered. This isn’t particularly user-friendly, but it can be handy when a real MIDI keyboard isn’t available.
Key Mapping
Alternately, keys on the keyboard can be bound to practically any button or switch in the Ableton interface. Binding the keys works in much the same way as the “MIDI Learn” feature. Just click the “KEY” button in the upper right corner, and anything that can be manipulated with a keystroke will be overlaid with an unappetizing orange hue. Click on the interface control you’d like to map and tap the appropriate key. A letter label will appear on the control. Click the “KEY” button again to exit the mapping mode. Your key should now be bound to the relevant control. Note: You can use both the MIDI keyboard and mapped keys at the same time. Be careful you don’t map keys that are already being used by the keyboard.
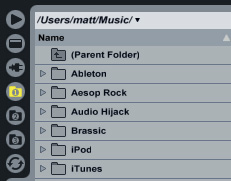
Down the left hand edge of the file browser are a collection of buttons for quickly jumping to common file locations. The device icon points to Ableton’s collection of instruments and effects, and the plug brings up the plug folder. The remaining numbered folders can be pointed wherever you like, and will remember your choices. You can point each one at a different location on your hard drive, to save you having to navigate between them.
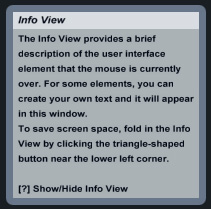
Arguably Live’s most useful little tool. In the lower left corner of the Live window is a triangular arrow. Click on that arrow and a small square box will appear next to the sample editor. Hover your cursor over any control on the screen and a description of what it does will appear in the Info View. Any existing keyboard shortcuts for that control will also be displayed.

