String parts are used incredibly frequently in electronic music, yet they can prove infuriatingly difficult to get right. Often, even when using high quality samples, they can sound sterile and unrealistic. There are, thankfully, a number of techniques you can use that will increase the realism of your string parts no end. It can be time consuming to get it right, but it is well worth the effort.
Selecting Your String Library
There is a wide selection of string sample libraries available, and the range can be quite daunting. The fact is that there are a number of very good libraries out there that will do a great job for you. Obviously budget restrictions will come in to play at some point, but it is worth investing in a decent library. It is actually even worth considering purchasing a couple of separate libraries from different manufacturers if you can afford it. This may seem extravagant, but the use of multiple timbres that you will get from using different libraries can really help to give you a big, rich sound. It is worth spending some time researching the options available, and deciding just how much control you will need (do you need multiple mic positions for example?). Sound On Sound is a great place to start your search, and you may want to begin by looking into such industry standard packages as East West/Quantum Leap Hollywood Strings, Vienna Symphonic Library Orchestral Strings, Cinematic Strings 2.0, and Audiobro LAScoring Strings 2. If, for now you really can’t afford a third party string library, you can still follow the guidelines below. They will certainly improve your overall sound, even if you are just using the string sounds that come bundled with Logic or Ableton Live.
Velocity Controls
This may seem like simple stuff, but any decent sample library will contain multiple layers of velocity data. If the velocity controls for your string part are high, the notes don’t just get louder – your samples may have a faster attack, a harsher timbre and so on. Spend some time listening to how moving the velocity controls changes the sound of the part as well as the volume. However you enter you part (either by playing it in, or by writing it in) – it is worth going in and listening to the completed part and tinkering with velocity controls until you are happy with the final sound.
Changing the velocity levels isn’t the only way of changing the volume level of a part however…

Velocity Data in ProTools
Recording Expression Data
If you want to improve the realism of your string parts, this is probably the single most important process to go through. We’ve already discussed using velocity to change the volume of a part, but here we will look at how using played in ‘expression data’ can add to the musicality and realism of a string part. For this you will need some kind of midi control, but even a keyboard is not necessary – you just need a midi controller with either a fader or a knob that can be assigned to control midi volume on your DAW.
Play through your string part, and use the midi control to change the midi volume of the string part in real time. Try fading the notes in and fading them out again – playing this data in will allow you to add real time expression to your part and it’s amazing how far this technique will go towards helping your part to sound realistic.
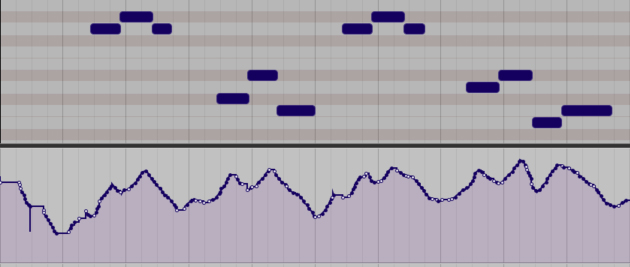
Velocity data, played in live to create a realistic volume envelope for a string part
Sweetening The Sound
The idea of ‘sweetening’ a sampled string or brass section had been around for quite some time. The idea is that you record a single live instrument, such as a violin over a string part, or trumpet over a brass part. This is layered in with your sample-based instruments, and the idea is that your ear will pick up the lead part and not notice that the rest of the part is made up of midi instruments. You can actually accomplish something very similar without recording any live instrumentation at all. Most string libraries will contain samples for solo instruments as well as violin sections, cello sections etc. Try layering in a solo violin on top of a violin section. Record the velocities and expression data in separately. The fact that not all of your violins sound exactly the same as each other, and that they’re not all playing together in perfect unison goes a long way towards tricking the ear into thinking that they are real. There are other tricks we can use too.
Tuning and Panning
All of your midi instruments will obviously be perfectly in tune. This just isn’t how real instruments sound, so it is actually worth considering detuning some instruments slightly to create a more realistic effect. Try moving each instrument/string section + or – a few cents. Somewhere between two and five tends to work quite well. It’s worth balancing things within the string section out, so the whole thing doesn’t end up sounding too sharp or flat. So you could for example, move your cello section up four cents, and your violas down 4. Finally, think about panning – think of how a string section would set up. All the musicians wouldn’t be able to stand in the same place so there would be some natural stereo width in there. Maybe pan your violins off to the left with your cellos round to the right – or even base your stereo field on the set-up of a symphony orchestra? As with all techniques such as these, experimentation is the key. Use this guide as a starting point to find out what works best for you.